CSS - Cascading Style Sheets
Introduction to CSS
Before starting to describe the elements of the Cascade Style Sheets language, we should first answer the question what is CSS? Simply said, CSS defines how to display an html document (fonts, colors, layouts etc.). The CSS elements were added to the HTML 4.0 specification in order to solve a problem. CSS enables developers to change the layout and look of all documents in a web site by just editing a single file; usually CSS styles are specified in an external file, so if one wants to change the overall style of the website, this is the file that needs to be changed. The need for CSS, the problem we mentioned that CSS was meant to solve is that before CSS, there existed only the Html language and the HTTP protocol and this formed the World Wide Web space. HTML was intended to define the structure of a document (i.e. headings, paragraphs, tables etc.), not the formatting of an element. When style attributes like font, color, background etc. were introduced into Html (in the form of tag attributes), maintaining a large web page in which formatting/style information was scattered all over the document became a nightmare for web developers. So, HTML 4.0 allowed formatting information to be removed from the document and placed separately (in .css files) A simple CSS example would look like this:
body {background-color: #aabbcc}
h1 {font-style: italic; font-size: 36pt}
h2 {color: blue}
p {margin-left: 50px}
- the <body> tag should have a background color of #aabbcc
- the <h1> heading tag should use an italic font of size 36pt
- the <h2> heading tag should use a blue color for displaying text
- a paragraph <p> tag should start at an offset of 50 pixels on the left
CSS syntax rules
A CSS style is formed by a sequence of rules and each rule has the following format:
selector { property: value; property: value; ...}
- a tag name; Ex. the following style selects all the <p> tags from the current document:
p { font-family: sans-serif } - a group of tags; Ex. the following style selects all the <h1>, <h2>, <h3>, <h4>,
<h5> and <h6> tags from the current document:
h1, h2, h3, h4, h5, h6 { color: red } - a class name (with or without a tag name); Ex. the first line selects all the <p> tags with the
class="right" from the current document and the second line selects all the tags with the class="right"
attribute from the current document:
p.right { text-align: right } .right { text-align: right } ... in html document: <p class="right"> Right aligned text </p> - an ID (with or without a tag name); Ex. the first line selects all the <div> tags with the
id="green" from the current document and the second line selects all the tags with the id="green"
attribute from the current document:
div#green { color: green } #green { color: green } ... in html document: <div id="green"> Green div... </div> - pseudo-classes and pseudo-elements
selector:pseudo-class {property: value; ...}
selector.class:pseudo-class {property: value; ...}
And the list of pseudo-classes is:
- anchor pseudo-classes:
a:link {color:#FF0000} : matches an unvisited link
a:visited {color:#00FF00} : matches a visited link
a:hover {color:#FF00FF} : matches a link when the mouse is over the link
a:active {color:#0000FF} : matches a selected link
- :first-child : matches an element that is the first child of any other element;ex.:
p:first-child { color: blue } - > selector:first-child : matches an element that is the first child of a specific element; ex.:
p > i:first-child { color: blue} - :lang : adds a style to an element with a specific lang attribute
- :active : adds a style to an element that has keyboard input focus
selector:pseudo-element {property: value; ...}
selector.class:pseudo-element {property: value; ...}
The list of pseudo-elements is:
- :first-letter – adds style to the first character of a text
div:first-letter { font-size: xx-large; } - :first-line – adds style to the first line of a text
div:first-line { color: red } - :before – adds content before an element
h1:before { content: url(smiley.jpg)} - :after – adds content after an element
h1:after { content: url(smiley.jpg)}
Adding style sheets to a document
There are three ways we can specify the CSS style for an html document: a) an external style sheet, b) an internal style sheet, and c) an inline style sheet. Examples:
/* Specifying an external style sheet */
<head>
<link rel="stylesheet" type="text/css" href="style.css"/>
</head>

/* Specifying an internal style sheet */
<head>
<style type="text/css">
p { margin-left: 10px }
</style>
</head>

/* Specifying an inline style sheet*/
<p style="color: red; margin-left: 10px"/>
- browser default
- external style sheet
- internal style sheet
- inline style
Background properties
The background properties are CSS properties that specifies the background of an Html tag. They are listed in the table below. There is a shorthand property for setting all the background-related properties in one single line, background. The most used background properties are background-color and background-image.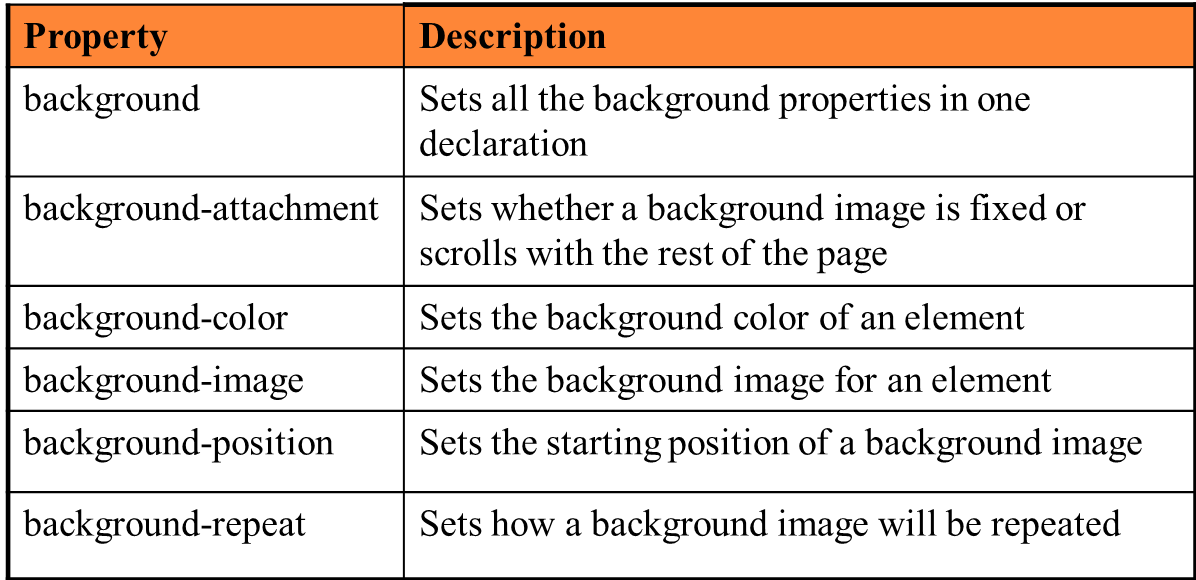
A CSS example using background properties is shown below.
div
{
background-color:#0f0f0f;
background-image:url(‘back.jpg');
background-repeat:repeat-x;
background-position:top right;
}
Border, margin and padding properties. The box model
The CSS box model specifies that each HTML element is a "box" from CSS perspective. This means it has a margin, border, padding and content as can be seen in the following picture. Not depicted in the picture is the outline which is an outer border in between the border and the margin.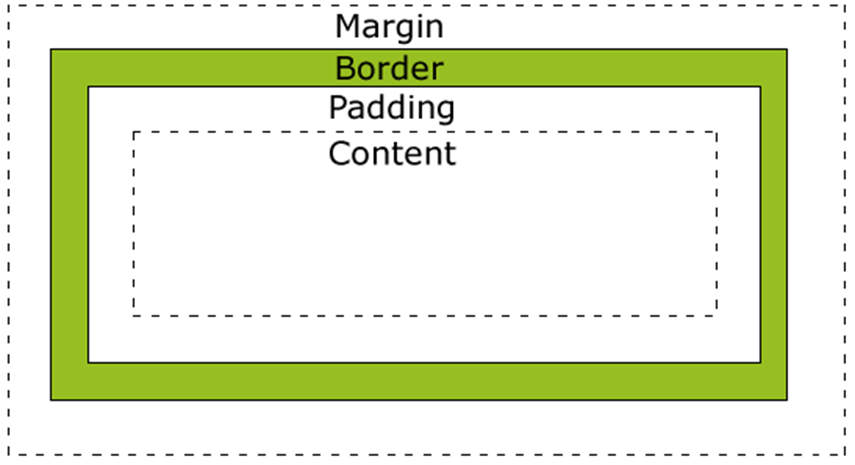
Total width = width + left_padding + right_padding + left_border + right_border+left_margin + right_margin
Total height = height + top_padding + bottom_padding + top_border + bottom_border + top_margin + bottom_margin
The border properties are CSS properties that allow us to set the border of an html element, actually all 4 borders, the left, right, top and bottom borders. Also they allow us to set the outline which is an exterior border (i.e. it is placed between the margin and the border - see the box model section later on in this document). We can set for each border the width of the border (in pixels, percents, cm, other units), its color and its style (solid, dotted, dashed, groove, image etc.). There are shorthand properties for setting all the above in one single line, for each border, border-top, border-bottom, border-left and border-right, also for each border feature (color, width, style) and one property that unites all of the border-related properties in one line border. All border-related properties are detailed in the table below.
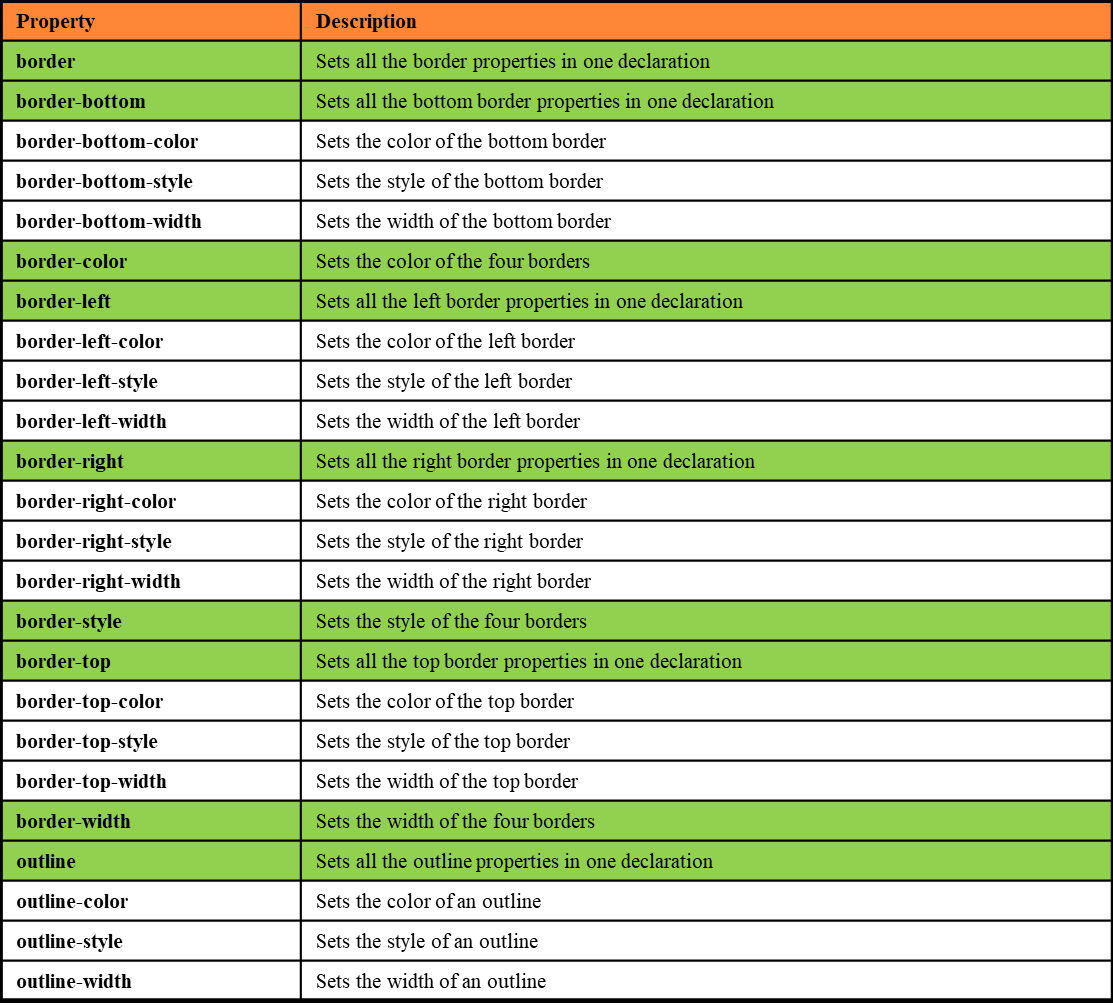
div {
border-top-style: solid;
border-bottom-style: solid;
border-left-style: dotted;
border-right-style: dotted;
border-width: 2px;
border-color: #00ff00;
}
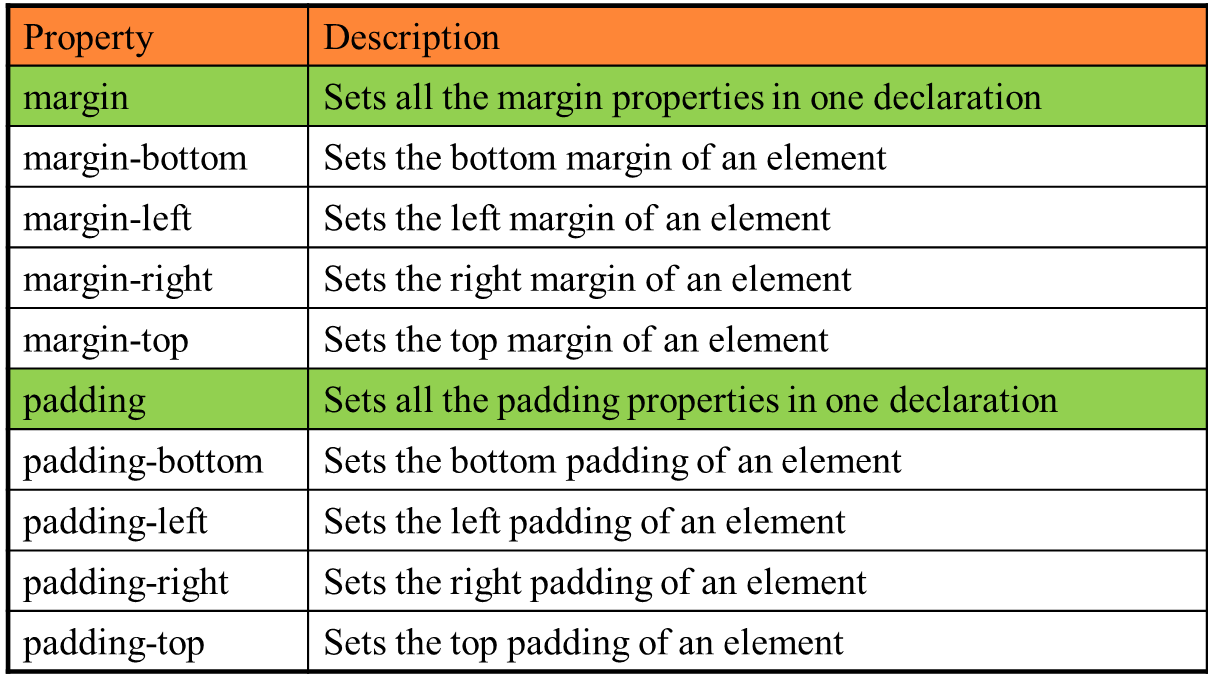
div  {
margin-top: 100px;
margin-bottom: 100px;
margin-left: 5%;
margin-right: 5%;
}
Dimension properties
Using CSS we can set the dimensions of Html tags, width and height. We can also set the minimum width and height or the maximum width and height and let the browser compute the actual width and height. These properties are outlined in the table below. They refer only to the width and height of the content of the Html box (see the box model above), not the total height and width of the Html box. The values to these properties can be absolute (in pixels, cm) or relative (in percentage of the dimensions of this tag's parent). It is always easier to specify the width and height in absolute units, but this is not the best strategy as it is not flexible (on different screen resolutions). Setting dimensions using relative units (percentages) is better, but at least for height, it gets a little bit trickier because the height of the parent, if not specified, depends on the height of its children.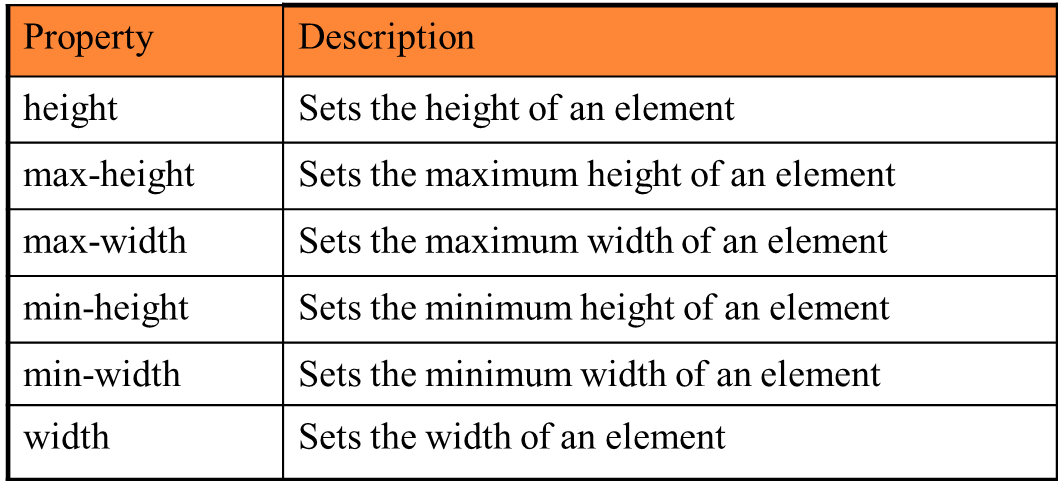
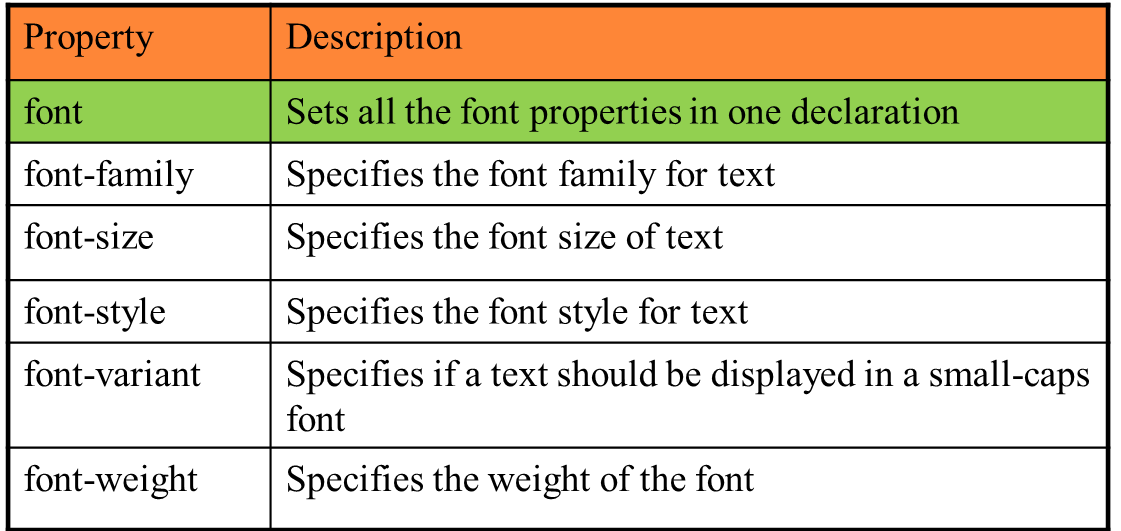
Text and font properties
Various text properties can be set using CSS, like the color of the text, the horizontal and vertical alignment, the decoration of text (underline, line-through, overline), direction (rtl - right to left, ltr - left to right), shadow etc. See the full list in the table below.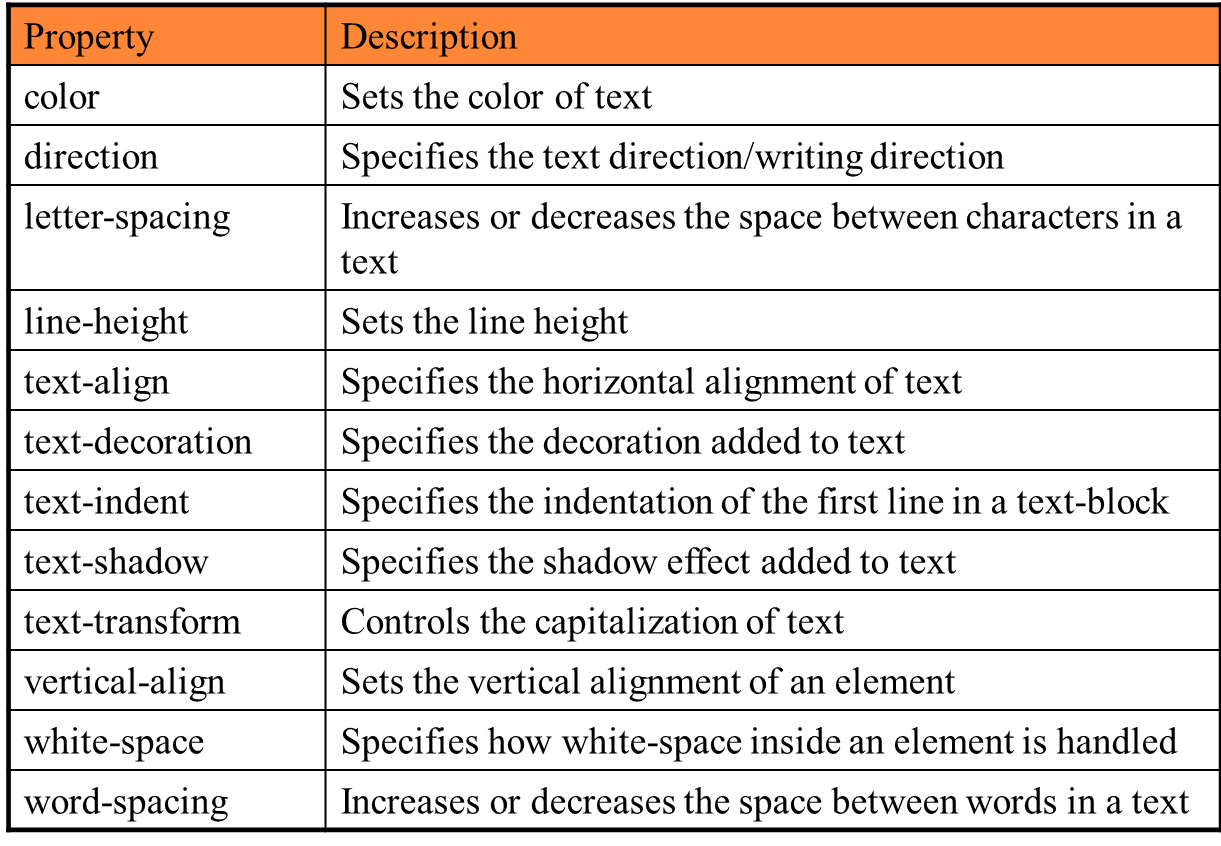
h1 {
color: #00ddee;
text-align: justify;
text-decoration: underline;
text-shadow: 10px;
}
p, div {
font-family:"Times New Roman", Arial, Serif;
font-style: italic;
font-size: 12px;
}
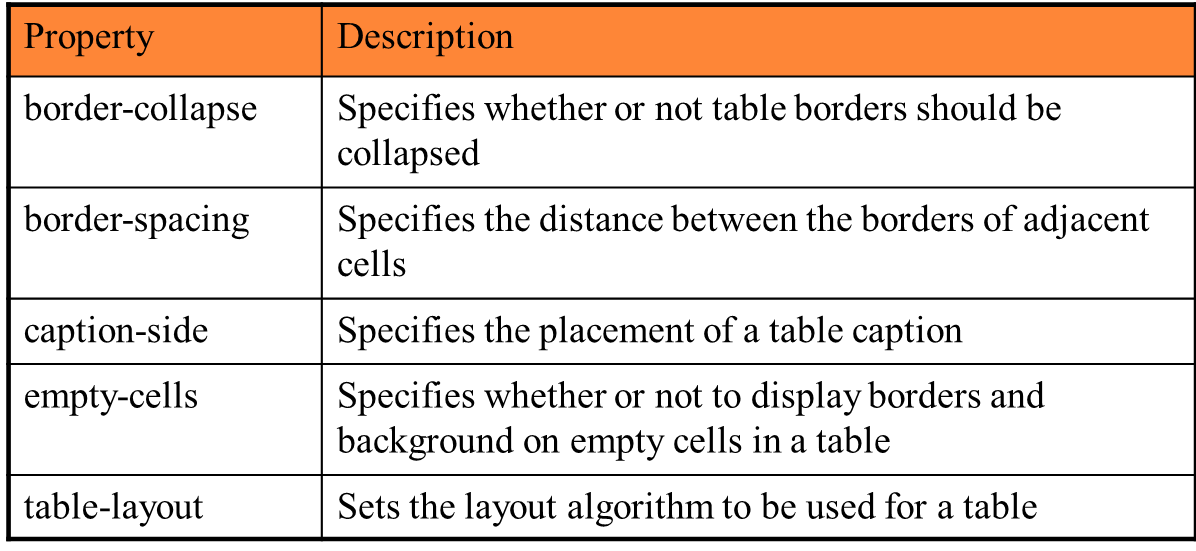
List and table properties
We can also set various properties for lists (<ul>, <ol>).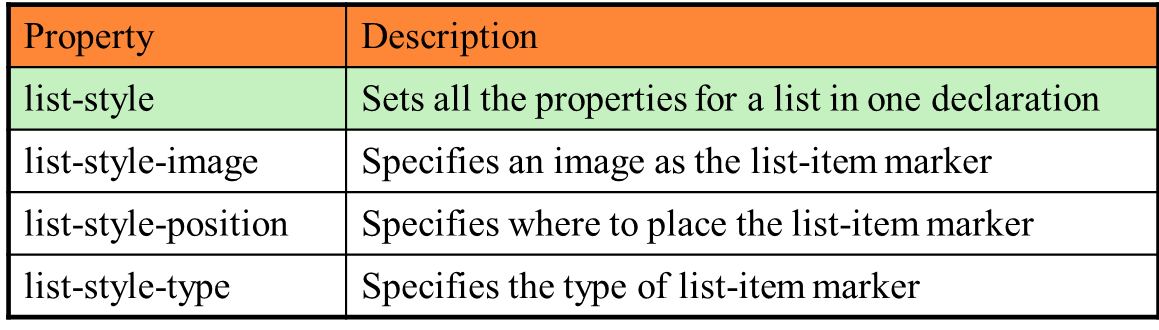
ul {
list-style-type: circle;
list-style-position: inside;
}
Positioning properties
The positioning related properties are depicted in the table below.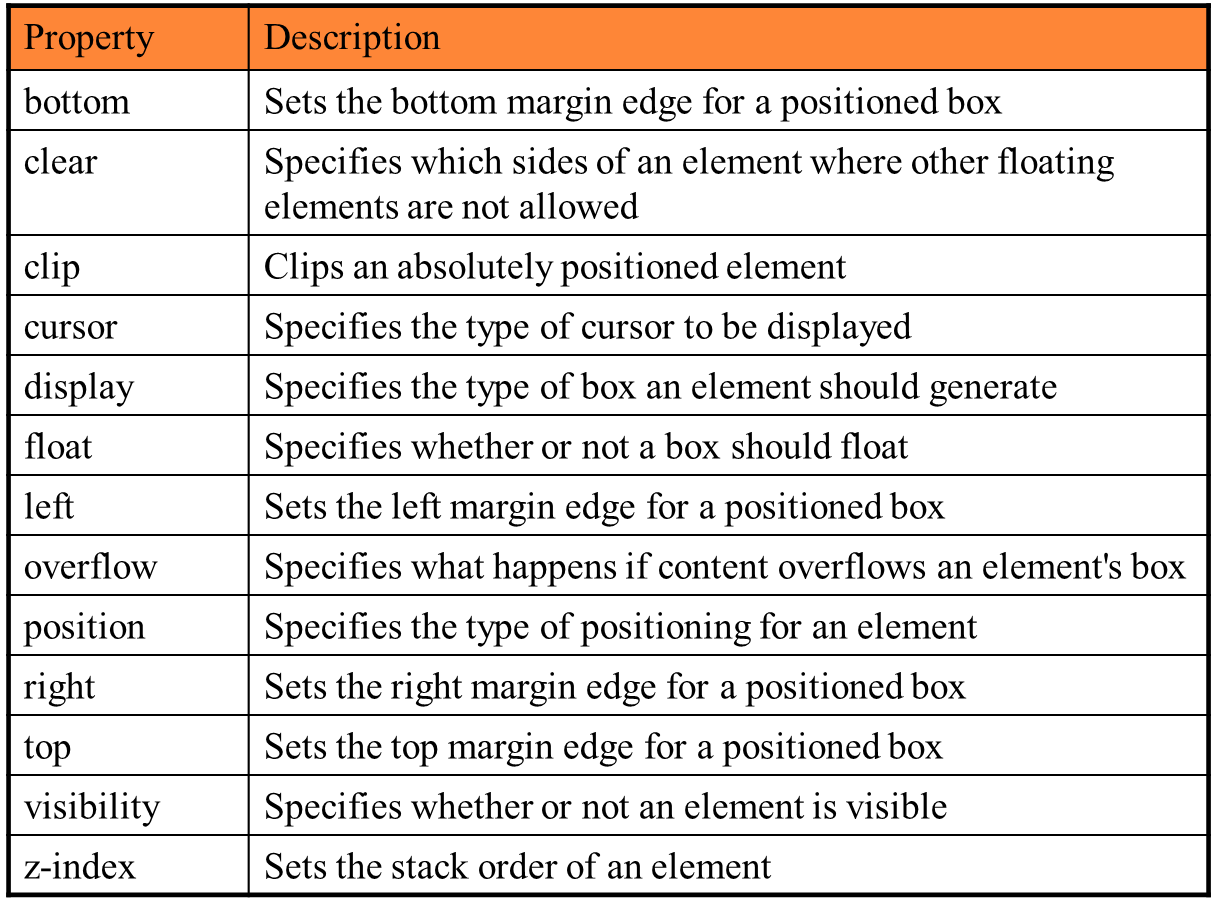
- static positioning: this is the default mode; a static element is positioned according to the normal flow of the page; this means that the Html elements are read from the begining of the document to the end and they are displayed by the browser in this order; each Html element has a default display mode - the simplest ones are display-inline (i.e. they are displayed on the same line with other elements, according to their heights or display-block (i.e. they are displayed on a new line on their own), but there are more complicated ones like display-flex.
- fixed positioning: the element will not move even if the window is scrolled (position: fixed; top: 20px; right: 40px); elements are removed from the normal flow and can overlap other elements
- relative positioning: the element is positioned relative to its normal position; the element can be moved and overlap other elements, but the reserved space from the element is preserved in the normal flow (position: relative)
- absolute positioning: the element is positioned relative to the first parent element that has a position other then static (if none, <html>); elements are removed from the normal flow and can overlap other elements; (position: absolute)
The z-index property defines the stack order of an element; if two elements overlap, the one with the highest z-index is displayed on top of the other.
With float, an html element can be pushed left or right allowing other elements to wrap around it. This can be used in order to place several elements on the same line (display: flex is however a better alternative). Html elements can float horizontally left or right (not vertically). float values can be: left | right | none | inherit.
Displaying and visibility
We can hide an element with consuming space: visibility: hidden.We can also hide an element without consuming space: display: none.
Html elements are displayed as (this is the value of the display property; not all values permitted by CSS are specified below, just a selection is listed):
- block – element takes the full width available and has a line break before and after it (e.g. h1, p, div)
- inline – element takes as much width as necessary and does not force line breaks (e.g. a, span)
- inline-block - element itself is formatted as an inline element, but you can apply height and width values, just like to a block element
- flex - the children of the element are displayed in a flex
- grid - the children of the element are displayed in a grid
- none - the element is not displayed at all and it does not consume space.
opacity: x – on Firefox, x between 0.0 and 1.0
filter:alpha(opacity=x) – on IE, x between 0 and 100.
References
- http://www.w3schools.com
- http://www.w3c.org